The loading times and overall speed of your website is crucial for user experience, however it also plays a large role in how well your website ranks on search engines such as Google, Bing and Yahoo. In this blog post, I’ll be discussing five steps to improve the loading times of your WordPress website. These steps include: bench-marking the current website speed to get an idea of where to improve, choosing the right hosting package that suits your websites needs, installing a free WordPress caching plugin, optimizing image file size using a free WordPress plugin, and finally, testing the loading times against the benchmark to measure the progress you’ve made.
For reference, the website I’ll be speeding up:
- WordPress Version: 5.1.1
- PHP Version: 7.1.26
- Theme: Astra
- Pagebuilder: Elementor
- Hosting: Bluehost VPS
- Using the “Homepage – Restaurant” template provided by Elementor.
Set a Benchmark Using a Speed Analysis Test
Before making changes to your WordPress website, it’s important to get a benchmark of the current performance in order to later measure against. This benchmark will also give good indicators in where our website can improve in terms of speed. In this blog post, I’ll be using a fantastic free-to-use website speed analysis tool, GTMetrix. I also recommend trying out the Pingdom Website Speed Test, another fantastic free speed analysis tool that provides similar feedback.
Setting The Stage: Performing a Speed Analysis With GTMetrix
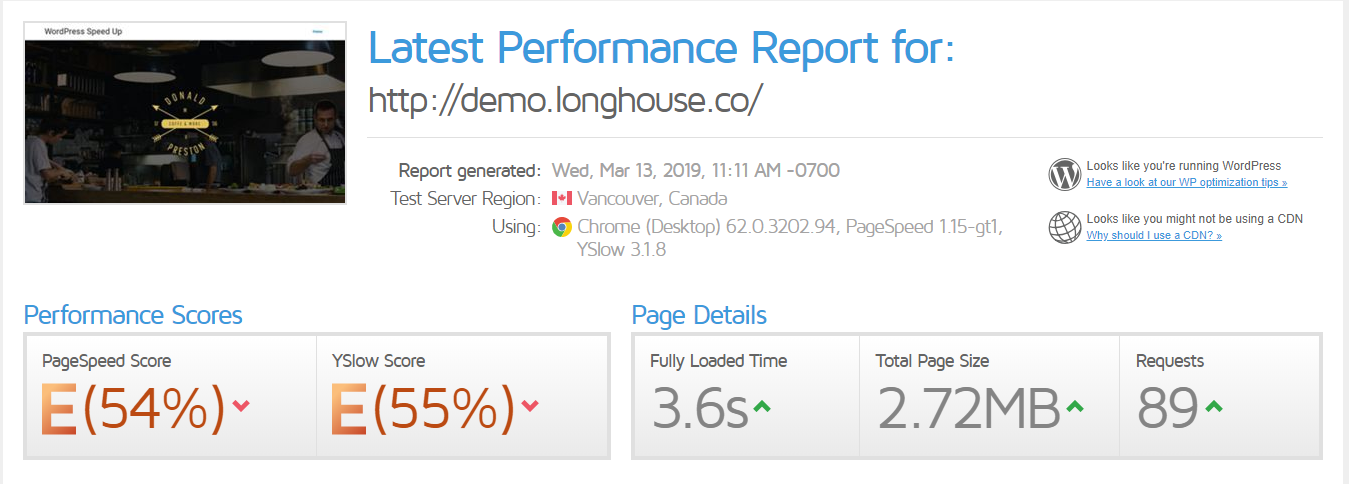
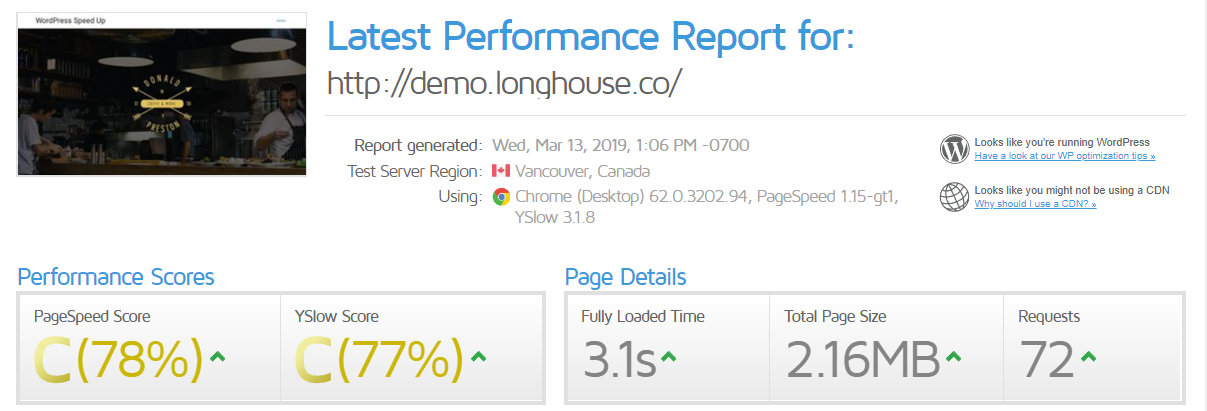
Head over to GTMetrix and type in your website URL into the field, the analysis should run quite quickly. Once done, you’ll see an overview of the performance report showing the Performance Scores based on PageSpeed and YSlow (learn more about PageSpeed and YSlow ratings), as well as the Page Details which tell you the full loading time, page size in megabytes, and number of requests made to the web server. Requests are made in order to retrieve each image, CSS file, javascript file, html file, and external resources that makeup the webpage. As we can see, the Performance Scores are well below averages of 72% and 70% for PageSpeed and YSlow, respectively. The Page Details are above average in all areas, however, there’s still room for improvement!
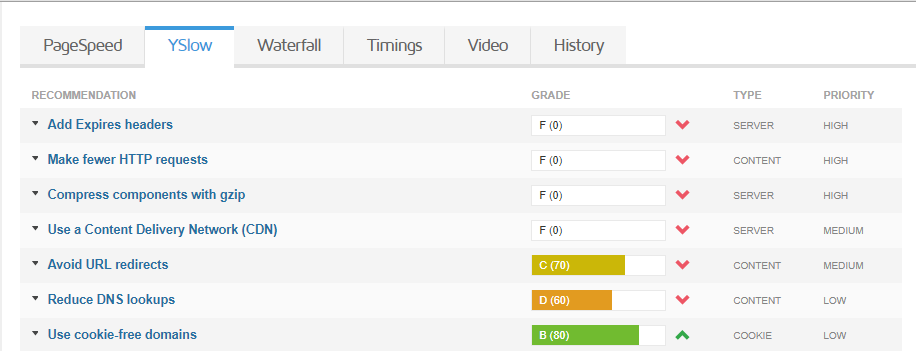
The PageSpeed and YSlow recommendations will share similarities and offer unique recommendations to improve the loading time of your website. Optimizing images, enabling gzip compression, and leverage browser caching will yield the most improvement in PageSpeed and YSlow scores, as well as improving the fully loaded time, total page size and number of requests made.

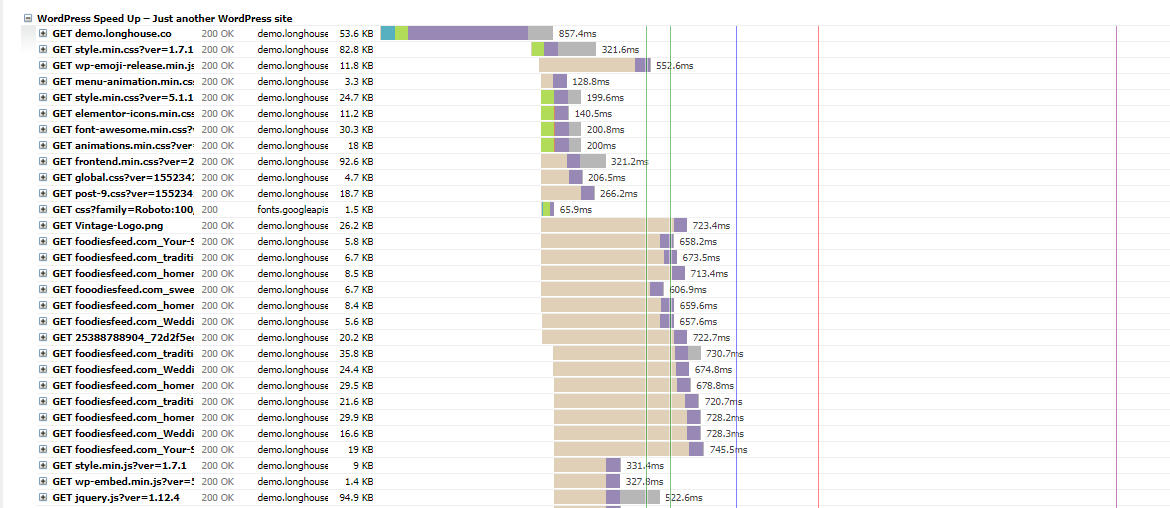
The waterfall graph is a nice visual representation of how long it takes for every component of the web page to load. The graph tells us what object our web browser requests from the server (JavaScript file, CSS file, image, etc), the response status (tells us if the request was successful or not), the origin of the file (mostly your websites URL, some external URL’s), the object size, and finally the request timings (describe how long it takes to retrieve the object depending on multiple factors). The waterfall graph may look a little intimidating, but the main thing you should look for are long bars.
Things that can contribute to long bars include:
- Downloading of large files
- Hitting bandwidth limits with multiple concurrent files downloading
- Network issues
For more information on the waterfall graph, check out this informative GTMetrix blog.
Hosting Package
Choosing the appropriate hosting package will play a large role in the load-times of your WordPress website. Most hosting providers will offer three different tiers: Shared Hosting, VPS Hosting, and Dedicated Hosting. More recently, WordPress and Cloud Hosting have been additions to the aforementioned hosting packages. I will cover the differences of the three main tiers: Shared, VPS and Dedicated.
Shared Hosting
Shared Hosting is generally the most affordable hosting option since you essentially share the same server with multiple customers. The main benefit of Shared Hosting is that it’s very affordable, usually less than $10 per month. Of course, paying less for something will most likely come with its drawbacks. Because your website is on a server being shared with numerous other websites, if one or more of those websites sees a sudden increase in traffic, it will occupy resources of the server, potentially slowing down your website.
VPS Hosting
VPS (Virtual Private Server) Hosting shares similarities to Shared Hosting since multiple websites share the same server. However, VPS Hosting gives you guaranteed resources in terms of CPU, memory, and disk space. A VPS Hosting package will also give you full control, as each dedicated space on the web-hosting providers server includes its own operating system (almost always CentOS or Ubuntu Server Linux Distros). You can expect to pay around $20 to $30 a month for a VPS Hosting package.
Dedicated Hosting
Dedicated Hosting is exactly as it sounds, dedicated to one website and has the best performance out of all the hosting packages. The Dedicated Hosting package will come with all of the benefits of VPS Hosting, but with even greater performance. This high-level of performance also comes at a higher price point, so only purchase a Dedicated Hosting package if your website requires it. If your website sees a high number of visitors everyday and you notice loading times dropping off dramatically, this may be an indicator that your website requires a Dedicated Hosting package. However, if your website is for a blog or small-business that gets very little traffic, a Shared or VPS Hosting package will suffice.
Implementing a WordPress Caching Plugin
WordPress was built to dynamically build each web page the visitor on your site requests by running PHP scripts and querying the database, put together the HTML, then deliver it to the visitor. Since running PHP scripts and querying the database every single time a visitor requests a page is extremely taxing on the web server, caching was introduced to save the normally dynamically generated HTML and deliver this to the visitor instead of running PHP scripts and querying the database each time a request is made.
A caching plugin is simply a WordPress plugin that gives your website the ability to not only generate the static HTML pages, but also minfies the HTML, JavaScript and CSS (removes comments and white-space from the source code of files), cache objects (caching results of expensive SQL queries to the database), and enable browser caching (decreases response time by using the cache available in site visitor’s web browser). We’re going to take advantage of all of these features in this demonstration.
For this demonstration, I will be using the free caching plugin W3 Total Cache, however there are countless other free caching plugins available for download on the WordPress repository. In my experience, W3 Total Cache performs the best.
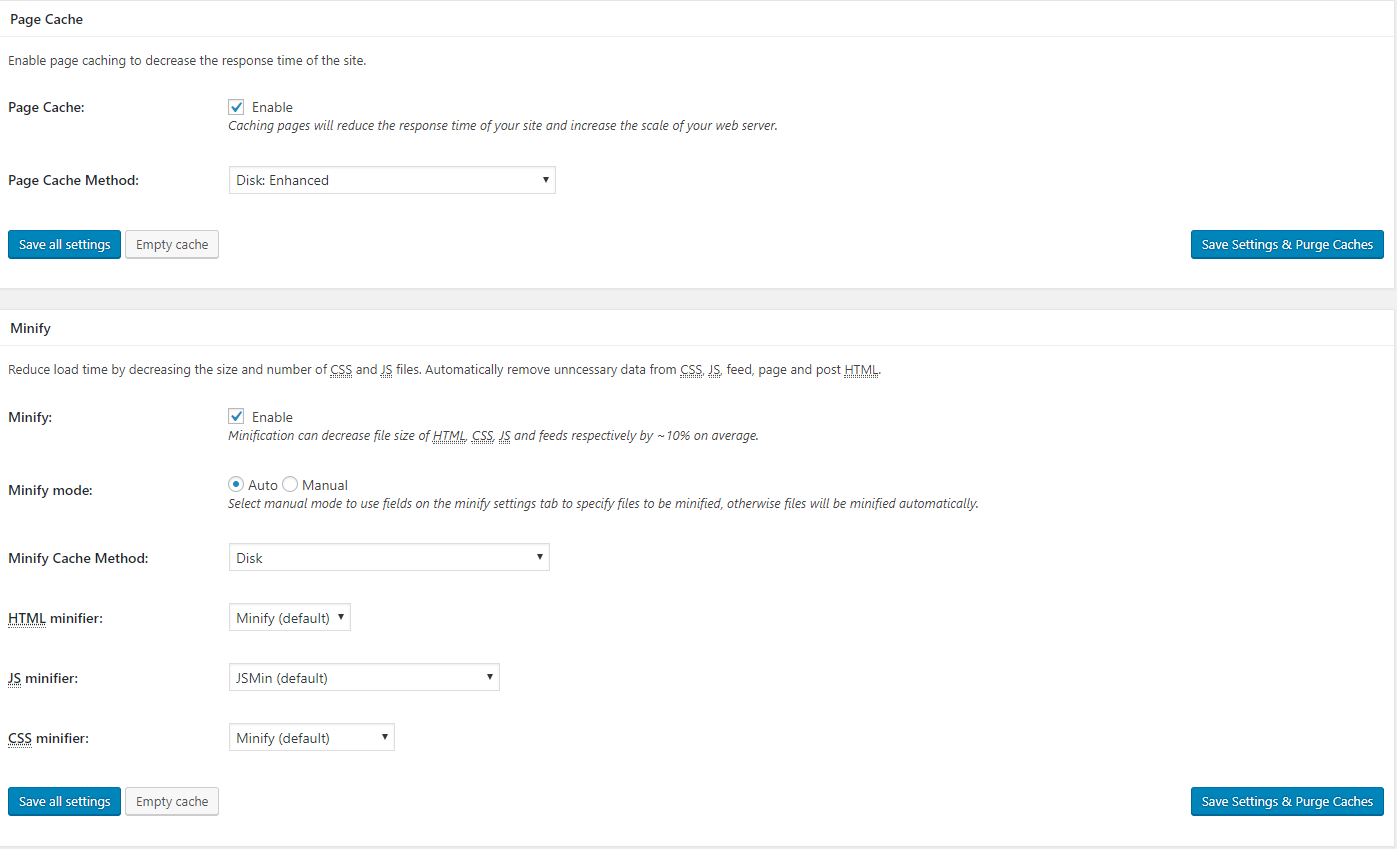
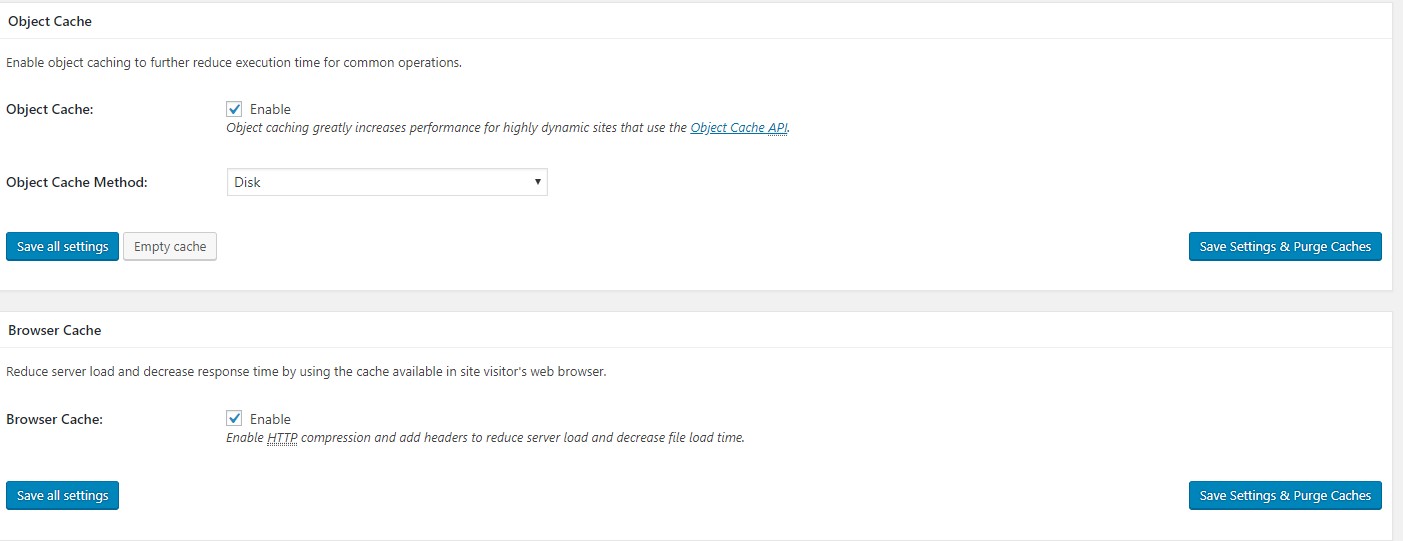
Image Optimization Plugin
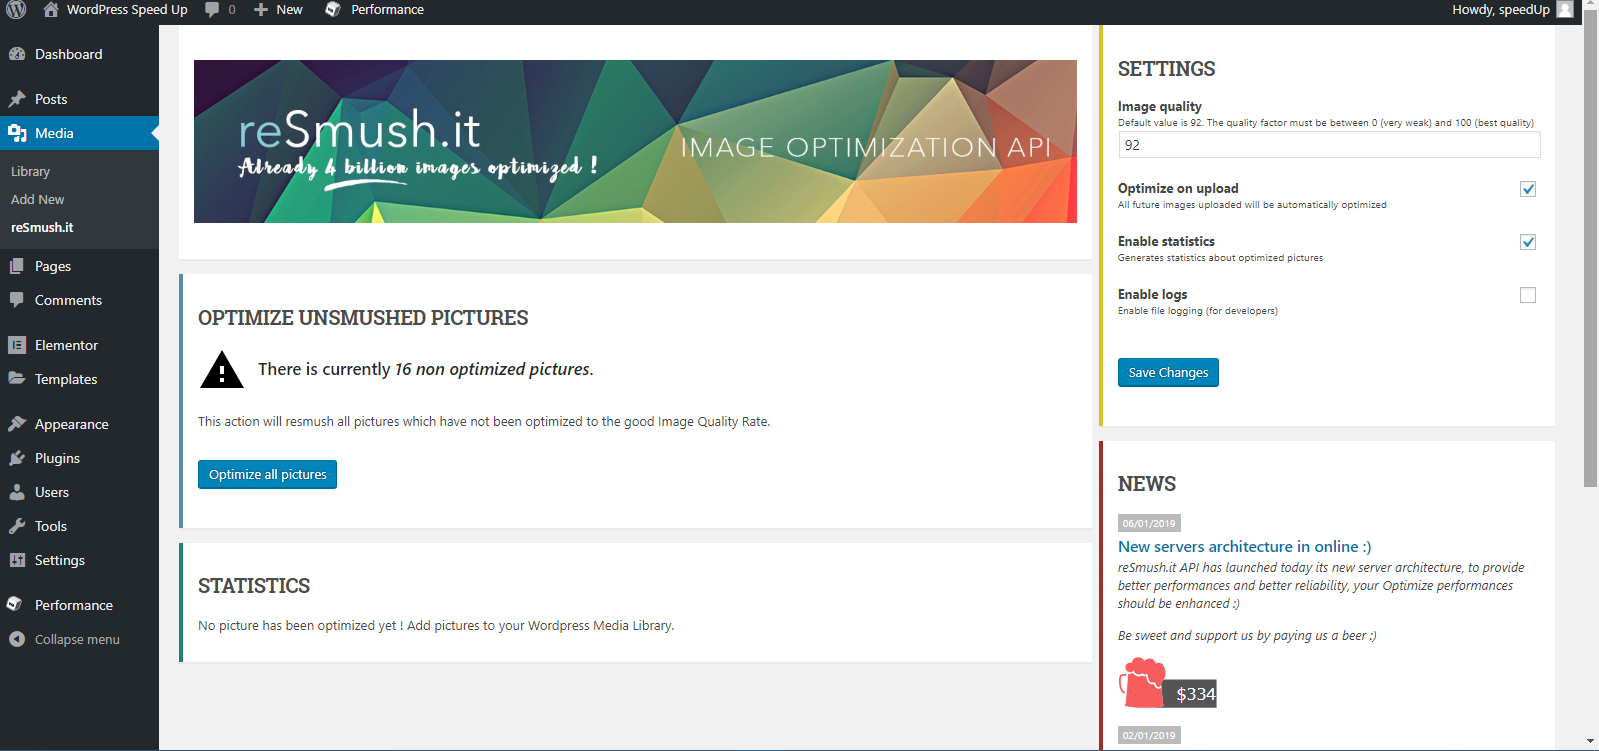
Optimizing the size of images on your WordPress website is extremely important not only for reducing the loading time of the website, but also for improving the experience of users. Image optimization essentially compresses the image to reduce the file size, while still maintaining the same quality, it’s almost magic! For this demonstration, I’ll be using the free image optimization plugin, reSmush.it. reSmush.it provides image size reduction based on several advanced algorithms and will optimize images up to 5MB in size for free. reSmush.it will bulk optimize all of the images on the WordPress website at once and automatically compress images on upload.
Once reSmush.it has been installed, it can be found in the “Media” area of your WordPress dashboard. To optimize all uploaded images on your website, click “Optimize all pictures” and simply wait for reSmush.it to do its job, and that’s it. Now all your images are optimized and you can be assured that future uploaded images will be optimized automatically.
Testing Changes
Continuously testing your progress is important for getting an idea of what’s working and what’s not. You’ll want to run a speed test every time you modify a setting in your caching plugin. Along with performing speed tests each time a change is made, you’ll want to open your website in an incognito tab to replicate the experience of a brand new visitor to your website, this will give you a first-hand look of how fast your website loads without browser cache. This also gives you the opportunity to see if any of the minification settings “broke” your website, this may occur depending on which theme and/or pagebuilder you use, it’s good to play with the settings of W3 Total Cache to find what works for your website.
Now it’s time to do another speed analysis using GTMetrix in order to compare our results with the benchmark test we did earlier. Let’s fire up GTMetrix and run a speed analysis.
That’s a heck of a lot better! We reduced the total page size from 2.72MB to 2.16MB, the fully loaded time from 3.6s to 3.1s and the number of requests from 89 to 72! The PageSpeed and YSlow are now above average which is also good. There are still areas of the website to improve upon that caching and image optimization plugins alone can’t fix. Luckily, GTMetrix provides detailed explanation based on the recommendations made by PageSpeed and YSlow.
Closing
Improving the speed of your WordPress website offers too many benefits to pass up, from improving user experience to ranking better on Google. Using free WordPress plugins and website speed analysis tools made available to us, achieving a faster loading, higher ranking website is easier than you think. If your website isn’t loading quickly and/or you’ve noticed your Google rankings drop, please feel free to reach out and request a free consultation.